In this post
- At a Glance
- Why This Tote Bag Sewing Pattern Works
- Materials and Tools Needed
- Choosing the Right Fabric for Your Tote
- Cutting Chart and Preparation
- Step-by-Step Sewing Instructions
- Finishing and Pressing
- Variations and Customizing Your Tote
- Troubleshooting Common Tote Bag Issues
- Care and Washing Instructions
- Frequently Asked Questions
- Your New Custom Tote Bag
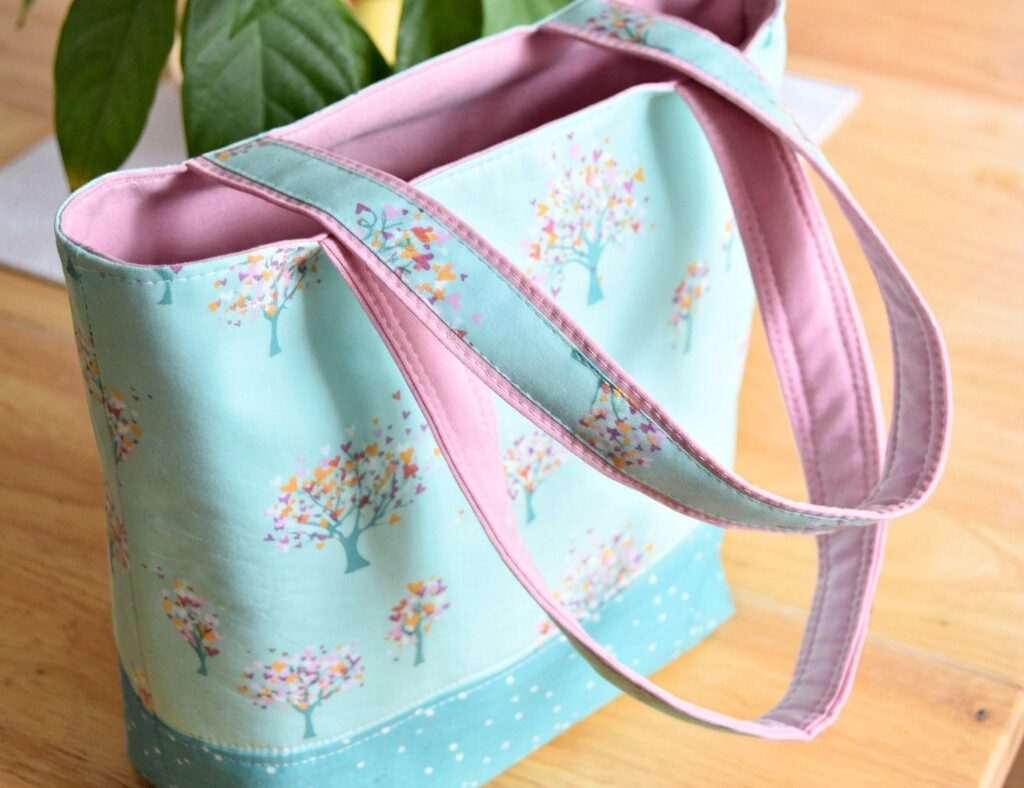
Finding a reliable tote bag sewing pattern that delivers both structure and clean lines is one of the most rewarding milestones for any sewist. If you want to make an everyday bag that stands upright rather than slouching flat, this project gives you the exact blueprint. You will construct a fully lined, color-blocked bag featuring a printed upper panel, a durable contrast base, and reinforced double-fabric shoulder straps. Sized at approximately 12 in x 14 in x 4 in (30 cm x 35 cm x 10 cm), this pattern is tailored for a confident beginner ready to master straight seams, simple piecing, and boxed corners. In just an afternoon, you will turn flat yardage into a durable, functional carryall.
At a Glance
Every successful sewing session starts with a clear roadmap of the essential specifications.
| Skill Level | Confident beginner |
|---|---|
| Time to Complete | 2-3 hours |
| Finished Dimensions | Medium: approx 12 in x 14 in x 4 in (30 cm x 35 cm x 10 cm) |
| Main Fabrics | Medium-weight quilting cotton (print, contrast, and lining) |
| Key Techniques | Color-blocking, fusing interfacing, boxing corners, clean-finish lining, topstitching |
Why This Tote Bag Sewing Pattern Works
The beauty of this design lies in its balanced proportions and intentional reinforcement. Many beginner bags skip interfacing entirely, which leaves lightweight cotton limp and prone to wearing out quickly at the stress points. This pattern applies medium-weight fusible interfacing directly to the exterior pieces, giving standard cotton the stability of a heavier canvas without putting undue strain on a home sewing machine.
The two-tone exterior splits the visual height of the bag while adding practical value. Placing your darker or patterned contrast fabric along the bottom base keeps everyday scuffs and surface dirt less visible. Inside, a fully enclosed lining conceals all raw edges and seam allowances, producing a professional finish that will not fray when you load your bag with groceries, books, or craft projects.
Materials and Tools Needed
Accurate yardage and the correct notions prevent mid-project interruptions and uneven stitching.
- Main exterior print fabric: 1/2 yard (0.5 m) medium-weight quilting cotton
- Contrast exterior fabric: 1/4 yard (0.25 m) medium-weight quilting cotton
- Lining fabric: 3/4 yard (0.7 m) medium-weight quilting cotton
- Fusible interfacing: 1 yard (0.9 m) medium-weight fusible interfacing
- Sewing machine: Fitted with a standard presser foot
- Needle: Universal sewing needle size 80/12
- Thread: 100% polyester all-purpose sewing thread in a coordinating color
- Cutting tools: Fabric shears or a rotary cutter, acrylic ruler, and self-healing cutting mat
- Marking tool: Water-soluble fabric pen or tailor’s chalk
- Notions: Sewing pins or quilting clips, iron, and ironing board
Choosing the Right Fabric for Your Tote
Quilting cotton is the primary recommendation for this pattern because it presses crisply, does not stretch out of shape, and feeds evenly through standard machine feed dogs. Look for a balanced, medium-weight weave (roughly 4.0 to 4.5 oz per square yard). Avoid lightweight cotton lawns, rayons, or knits, as they lack the tensile strength needed to support weighted items without warping the seams.
Selecting your prints is where the visual design comes together. The photographed sample features a light aqua exterior with a colorful tree and heart motif on top, grounded by an aqua and white polka dot base, and lined with a solid soft pink interior that continues onto the back of the straps. When pairing fabrics, make sure all chosen yardages have similar fiber contents and weights so they shrink and press at identical rates during washing.
Pro tip: Always pre-wash and press your cotton fabrics with steam before measuring and cutting. Unwashed cotton can shrink up to 5 percent on its first wash, which can cause your exterior and lining to pull unevenly if washed after assembly.
Cutting Chart and Preparation
Precision cutting ensures that side seams align and boxed corners match up without distortion.
| Piece Name | Fabric Type | Quantity | Cut Dimensions (Width x Height) |
|---|---|---|---|
| Main Exterior Panel | Main Print Cotton | 2 | 15 in x 11.5 in (38 cm x 29 cm) |
| Bottom Contrast Band | Contrast Cotton | 2 | 15 in x 6 in (38 cm x 15 cm) |
| Lining Panel | Lining Cotton | 2 | 15 in x 16.5 in (38 cm x 42 cm) |
| Outer Strap Piece | Main Print Cotton | 2 | 4 in x 24 in (10 cm x 61 cm) |
| Strap Interfacing | Fusible Interfacing | 2 | 1 in x 24 in (2.5 cm x 61 cm) |
| Main Panel Interfacing | Fusible Interfacing | 2 | 15 in x 11.5 in (38 cm x 29 cm) |
| Bottom Band Interfacing | Fusible Interfacing | 2 | 15 in x 6 in (38 cm x 15 cm) |
Once your pieces are cut, place your fusible interfacing with the bumpy (adhesive) side facing the wrong side of each corresponding exterior fabric piece. Set your dry iron to the cotton setting, press down firmly for 10 to 15 seconds per section without sliding the iron, and let the pieces cool flat on your ironing board so the glue cures fully.
Step-by-Step Sewing Instructions
Use a standard 1/2 inch (1.3 cm) seam allowance throughout this tutorial unless explicitly noted otherwise. Set your stitch length to 2.5 mm for construction seams and 3.5 mm for topstitching.
Piecing the Exterior Panels
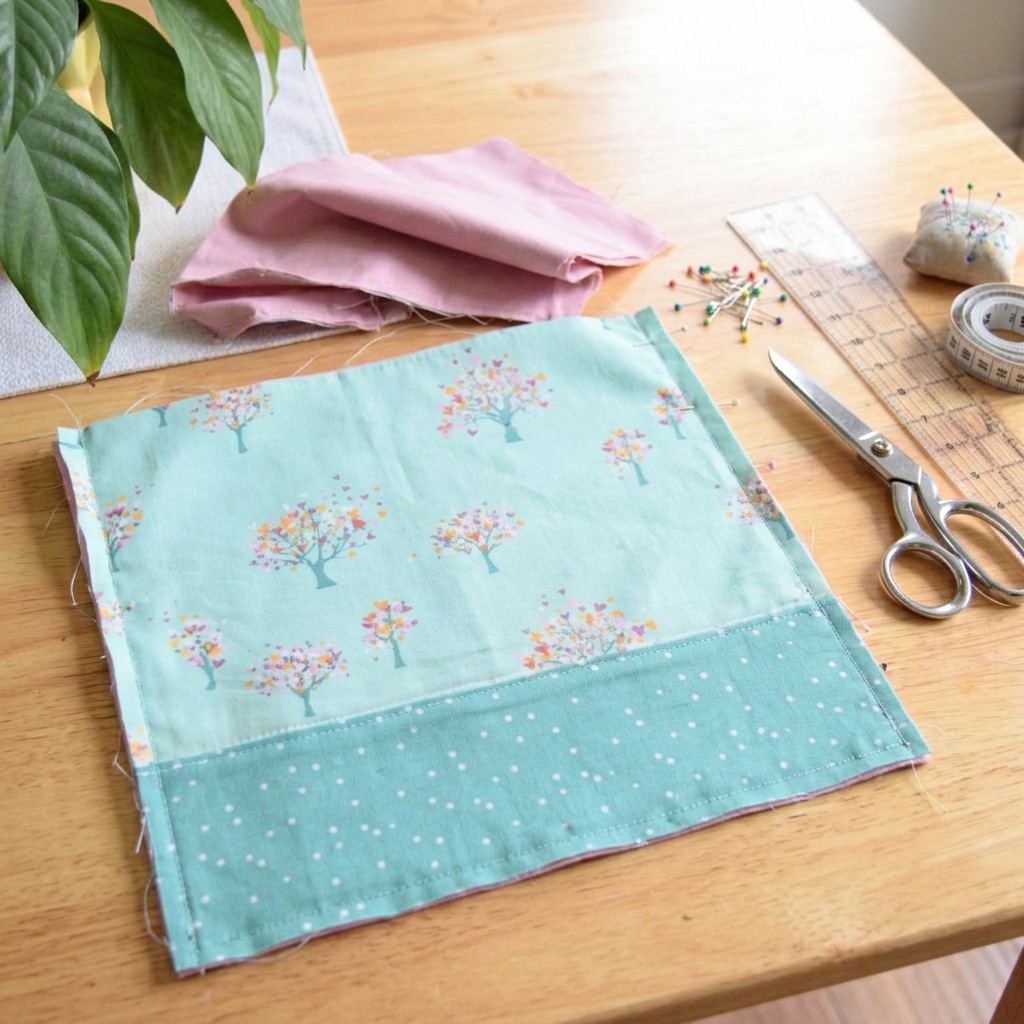
- Join the exterior panels: Place one main exterior print piece and one bottom contrast band with right sides together along the 15-inch (38 cm) edge. Pin along the raw edge.
- Stitch the seam: Sew across the pinned edge using a 1/2 inch (1.3 cm) seam allowance, backstitching at the start and finish. Repeat this process for the second set of exterior panels.
- Press the seam allowances: Place the joined panels right side down on your pressing mat. Press the seam allowances flat, then press both seam allowances downward toward the darker bottom contrast band.
- Topstitch the seam line: Flip the panel to the right side. Using a 3.5 mm stitch length, topstitch 1/8 inch (3 mm) below the seam on the contrast fabric to secure the seam allowance flat inside.
Preparing and Attaching the Straps
- Fuse strap reinforcement: Center a 1-inch (2.5 cm) strip of fusible interfacing along the wrong side of each strap piece and press to fuse.
- Fold and press the straps: Fold each strap in half lengthwise with wrong sides together, press to create a center crease, and unfold. Fold the two long raw edges inward so they meet at the center crease, press, then fold the strap along the original center crease to enclose the raw edges. The strap will now be 1 inch (2.5 cm) wide.
- Topstitch the strap edges: Pin or clip the long edges closed. Topstitch down both long sides 1/8 inch (3 mm) from the edge. Repeat for the second strap.
- Position the straps on the exterior: Lay one exterior panel right side up. Measure 4 inches (10 cm) inward from each side along the top raw edge and mark with chalk. Place the raw ends of one strap along the top raw edge at these marks, ensuring the strap is not twisted. Pin securely.
- Baste the straps: Sew the strap ends in place using a 1/4 inch (6 mm) seam allowance to secure them for final assembly. Repeat for the second exterior panel.
Pro tip: When basting the straps, stitch back and forth across each strap end twice. This extra reinforcement prevents the handles from shifting or pulling out when you join the lining to the exterior later.
Assembling the Exterior and Boxing Corners
- Pin exterior pieces: Place the front and back exterior panels right sides together. Match the side seams, especially the junction where the main print meets the contrast base, and pin along both sides and the bottom edge.
- Stitch the outer bag: Sew down the left side, across the bottom, and up the right side using a 1/2 inch (1.3 cm) seam allowance, leaving the top edge completely open. Press the seams open.
- Mark corner cutouts: Using an acrylic ruler and chalk, measure and mark a 2-inch by 2-inch (5 cm x 5 cm) square at both bottom corners. Measure directly from the cut raw fabric edges, not from the stitch line.
- Cut the corner squares: Use sharp fabric shears to cut out both 2-inch (5 cm) squares through both layers of fabric.
- Box the corners: Pull the front and back fabric layers apart at one corner cutout until the side seam aligns directly on top of the bottom seam, right sides touching. Flatten the corner into a straight horizontal line. Pin the seam junction in place.
- Stitch across the boxed corner: Sew across the raw edge using a 1/2 inch (1.3 cm) seam allowance, backstitching over the center seam junction for strength. Repeat on the remaining bottom corner.
Sewing and Attaching the Lining
- Assemble the lining panels: Place the two lining pieces right sides together. Pin the sides and bottom.
- Leave a turning gap: Sew the two side seams completely. On the bottom seam, sew 2 inches (5 cm) inward from each outer edge, leaving a 4-inch to 5-inch (10 cm to 13 cm) unstitched opening in the center for turning the bag later.
- Box the lining corners: Cut out matching 2-inch by 2-inch (5 cm x 5 cm) squares from the bottom corners of the lining. Align the side and bottom seams just as you did on the exterior, and sew across both corners with a 1/2 inch (1.3 cm) seam allowance.
- Nest exterior and lining: Turn the exterior bag right side out with the straps pointing downward. Leave the lining bag wrong side out. Insert the exterior bag inside the lining bag so that their right sides are touching.
- Align top raw edges: Match the side seams of the exterior and lining. Push the straps down between the two layers so they stay out of the seam path. Pin or clip all the way around the top perimeter.
- Stitch the top edge: Sew completely around the top circular opening using a 1/2 inch (1.3 cm) seam allowance, backstitching over the side seams and strap insertion points for extra durability.
Final Pressing and Topstitching
- Turn the bag right side out: Reach through the opening in the bottom of the lining and gently pull the exterior bag and straps through. Work the fabric through slowly to avoid popping the side stitches.
- Close the lining gap: Press the raw edges of the lining opening inward by 1/2 inch (1.3 cm) so they align with the sewn seam. Edge-stitch the opening closed by machine 1/16 inch (1.5 mm) from the fold, or hand-sew with an invisible ladder stitch.
- Push lining into place: Push the lining down into the exterior bag. Use your fingers to roll the top seam so that the exterior fabric rolls slightly over the lining (about 1/16 inch or 1.5 mm) to keep the lining invisible from the outside.
- Press the top edge: Press the upper rim thoroughly with a steam iron, using pins or clips to hold the crisp edge flat.
- Complete perimeter topstitching: Lengthen your stitch to 3.5 mm. Topstitch around the entire top rim of the bag, 1/8 inch (3 mm) to 1/4 inch (6 mm) from the edge. Sew slowly over the strap bulk.
Finishing and Pressing
A crisp final press elevates the structure of your handmade bag from homemade to store-bought quality. Place the finished bag over the narrow end of an ironing board or use a tailor’s ham inside the corners to shape the base. Press along the four vertical side folds and the boxed base seams with moderate steam to give the cotton a defined, boxy silhouette.
Topstitching around the upper edge does more than look attractive; it anchors the lining firmly to the exterior. This structural line prevents the lining from rolling upward when you pull items out of your bag. Take your time navigating the seam intersections where the handles attach, and use your machine’s handwheel if the needle encounters dense fabric layers.
Variations and Customizing Your Tote
You can adapt this foundational design using simple adjustments to suit specific daily needs.
- Fabric blocking proportions: Shift the height of the contrast base by cutting a taller bottom panel (such as 8 inches or 20 cm) and a shorter main panel to emphasize a bold geometric contrast.
- Strap length modifications: For an over-the-shoulder fit over winter coats, lengthen the strap pieces from 24 inches (61 cm) to 28 or 30 inches (71 to 76 cm). For a handheld market tote, shorten them to 16 inches (41 cm).
- Tonal color schemes: Pair neutral canvas-toned cotton on the base with vibrant graphic prints on top for a modern look, or use contrasting solid shades for a clean color-blocked aesthetic.
Troubleshooting Common Tote Bag Issues
Small errors in alignment or pressing can be corrected easily using these straightforward remedies.
| Problem | Likely Cause | Practical Fix |
|---|---|---|
| Exterior seams do not align at the side seams | Panels shifted during stitching or seam allowances were uneven during piecing | Nest the contrast seam allowances in opposite directions when pinning the side seams before sewing. |
| Lining bulges or sags above the top edge | Lining was cut slightly larger than the exterior, or the top seam was not rolled outward | Roll the exterior seam 1/16 inch (1.5 mm) over the lining and press with steam before final topstitching. |
| Bag walls collapse when standing | Interfacing was too lightweight or was not fused properly with heat and pressure | Ensure medium-weight interfacing is fused completely with a hot, dry iron for 10-15 seconds per area. |
| Skipped stitches over the strap junctions | Standard needle is struggling through multiple layers of interfaced fabric | Switch to a fresh universal size 80/12 or a denim size 90/14 needle and turn the handwheel manually over bulk. |
Care and Washing Instructions
Because your bag is constructed from 100% medium-weight quilting cotton and quality fusible interfacing, it is simple to clean. Hand wash or machine wash on a gentle cycle using cold water and mild detergent. Hot water can break down the adhesive resin in the interfacing over time, causing small ripples or bubbling on the exterior panels.
Reshape the bag while it is damp and hang it by the straps to air dry. Avoid machine drying, which can create hard creases in the interfaced panels. Once dry, restore its crisp profile by pressing with a steam iron set to the cotton setting.
Frequently Asked Questions
Can I make this tote bag without interfacing?
You can assemble the bag without interfacing, but it will lack body and will collapse flat when placed on a table. Fusible interfacing provides the essential rigidity that supports the boxed base and keeps the straps from stretching under load.
How do I adjust the size of this tote bag pattern?
To change the dimensions, add or subtract the same number of inches from both the exterior and lining width and height. For a deeper base, increase the corner cutout size, keeping in mind that cutting a 3-inch (7.5 cm) square will create a 6-inch (15 cm) wide base while reducing the overall height of the bag.
What is the best sewing machine needle to use for quilting cotton?
A universal sewing needle in size 80/12 is ideal for assembling medium-weight quilting cotton and interfacing. If you notice resistance or skipped stitches when topstitching over the thick strap junctions, change to a size 90/14 jeans or microtex needle.
How do I box the corners of a bag neatly?
Press your side and bottom seams open before aligning them at the corner cutouts. Naming and matching the seam lines precisely and pinning them together ensures that the horizontal base seam remains straight and centered on both sides.
Your New Custom Tote Bag
Completing this project gives you a durable, balanced accessory that showcases your piecing and topstitching skills. Mastering this tote bag sewing pattern opens the door to creating customized gifts, grocery carriers, and everyday project bags with ease. For the cleanest finish on your next build, always test your topstitch tension on a scrap of interfaced fabric before stitching your final perimeter.