In this post
- At a Glance
- Why This Travel Duffle Bag Sewing Pattern Works
- Materials and Tools Needed
- Choosing the Right Fabric and Interfacing
- Cutting Chart and Preparation
- Step-by-Step Construction Instructions
- Finishing and Pressing
- Variations and Customizing
- Troubleshooting Common Duffle Bag Sewing Issues
- Care and Washing Instructions
- Frequently Asked Questions
- Ready for Your Next Getaway
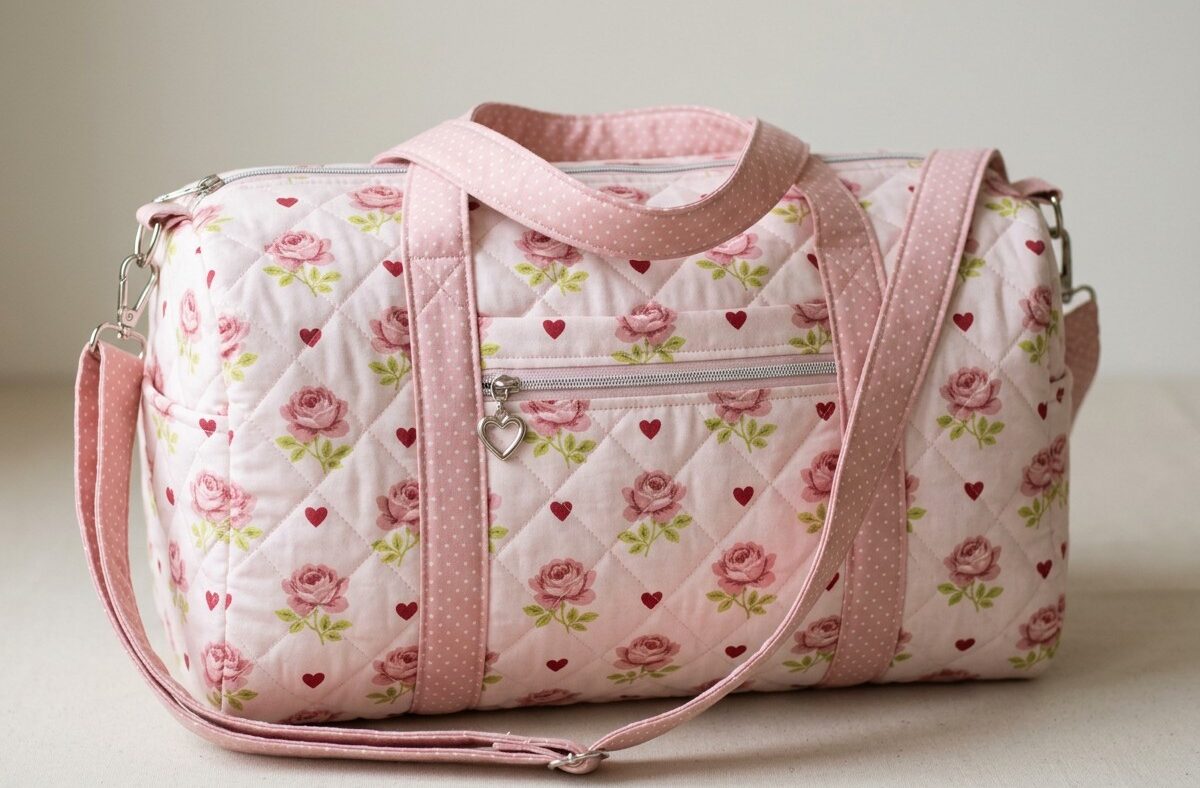
Finding a reliable, roomy bag pattern that balances soft structure with clean hardware installation can transform your weekend packing. This travel duffle bag sewing pattern guides you through constructing an 18 in wide by 12 in high by 8 in deep (46 cm x 30 cm x 20 cm) quilted weekender. Designed for intermediate sewists, this project combines soft quilted cotton with sturdy contrast straps, an exterior zippered pocket with a metallic puller, and an adjustable shoulder strap. You will learn how to handle bulk across quilted layers, insert two different zipper styles cleanly, and box corners for maximum interior volume. In roughly 3 to 4 hours at your sewing machine, you will produce a durable, fully lined travel bag ready for road trips or overhead compartments.
At a Glance
| Skill Level | Time to Complete | Finished Dimensions | Main Materials | Core Techniques |
|---|---|---|---|---|
| Intermediate | 3-4 hours | 18 x 12 x 8 in (46 x 30 x 20 cm) | Quilted cotton, polka dot cotton, fusible fleece | Recessed top zipper, exterior pocket insertion, boxing corners |
Why This Travel Duffle Bag Sewing Pattern Works
Making a durable duffle requires balancing flexibility with enough backbone to keep the bag from collapsing when set down. This pattern uses pre-quilted cotton or self-quilted fabric backed with fusible fleece to create soft-sided structure without the rigid weight of heavy duck canvas or plastic inserts. The polka dot accent straps run down the front panels, reinforcing the bag to support clothes, shoes, and toiletries.
You will expand your bag-making repertoire by mastering two essential zipper installations. The front exterior pocket incorporates a clean topstitched opening with a decorative metallic heart pull, while the main opening features a recessed 24-inch (60 cm) zipper that opens wide for easy packing. These methods ensure the finished duffle withstands travel strain while maintaining neat, enclosed seams on both the outside and inside.
Materials and Tools Needed
- Quilted cotton fabric: 1.5 yards (1.4 m), medium-weight cotton quilted with light batting for the main outer body and lining panels.
- Polka dot cotton fabric: 1 yard (0.9 m), coordinating medium-weight cotton for handles, accent bands, strap, and D-ring tabs.
- Fusible fleece interfacing: 1 yard (0.9 m), to add structure behind unquilted cotton sections or pocket panels.
- Main top zipper: 1 piece, 24 in (61 cm) nylon coil zipper (closed-end or separating).
- Pocket zipper: 1 piece, 10 in (25 cm) nylon zipper with decorative metallic heart puller.
- Hardware: 1 piece 1.5 in (3.8 cm) metal strap slider and 2 matching 1.5 in (3.8 cm) metal D-rings.
- Sewing machine: Standard domestic machine fitted with a zipper foot and standard presser foot.
- Needles: Universal sewing machine needles in size 80/12 (for straps) and size 90/14 (for quilted layers).
- Cutting tools: Rotary cutter, acrylic ruler, cutting mat, and fabric shears.
- Notions: All-purpose polyester thread, sewing clips or long straight pins, fabric marking pen, iron, and ironing board.
Choosing the Right Fabric and Interfacing
Medium-weight quilting cotton delivers vibrant prints while remaining easy to manipulate under a standard presser foot. Pre-quilted cotton fabric saves time, but you can quilt your own by fusing fleece to the wrong side of your main cotton print and stitching parallel diagonal lines spaced 1 inch (2.5 cm) apart. Avoid overly lightweight apparel cottons, which stretch under tension, as well as ultra-heavy canvas, which creates unmanageable bulk where the boxed corners meet the vertical accent straps.
The accent fabric used for the handles and strap requires structural support to prevent twisting. Pairing medium-weight cotton with fusible fleece or mid-weight interfacing gives the carrying handles a comfortable, padded feel in hand without stretching over time. Fusible fleece also helps the front exterior pocket maintain a flat, crisp profile against the quilted main body.
Cutting Chart and Preparation
| Piece Name | Fabric | Quantity | Cut Dimensions (Width x Height) |
|---|---|---|---|
| Main Body Exterior | Quilted Cotton | 2 | 19 x 13 in (48.3 x 33 cm) |
| Main Body Lining | Quilted or Lining Cotton | 2 | 19 x 13 in (48.3 x 33 cm) |
| Exterior Front Pocket | Quilted Cotton | 1 | 11 x 8 in (28 x 20.3 cm) |
| Exterior Pocket Lining | Polka Dot Cotton | 1 | 11 x 8 in (28 x 20.3 cm) |
| Carrying Handles | Polka Dot Cotton | 2 | 4 x 42 in (10.2 x 106.7 cm) |
| Adjustable Shoulder Strap | Polka Dot Cotton | 1 | 4 x 54 in (10.2 x 137.2 cm) |
| D-Ring Tabs | Polka Dot Cotton | 2 | 4 x 4 in (10.2 x 10.2 cm) |
| Top Zipper Plackets | Polka Dot Cotton | 4 | 2 x 20 in (5.1 x 50.8 cm) |
Before cutting your pieces, press all fabrics with a warm iron to eliminate creases. Use a self-healing cutting mat and acrylic ruler to cut accurate 90-degree corners. Apply fusible fleece to the wrong side of the carrying handles, shoulder strap, and pocket pieces using a damp pressing cloth and firm downward pressure for 10 to 15 seconds per section. Keep your rotary cutter blade closed when not actively cutting to prevent accidental cuts to your fingers or fabric.
Step-by-Step Construction Instructions
All seams use a standard 1/2 inch (1.3 cm) seam allowance unless specifically noted otherwise. Set your stitch length to 2.5 mm for main construction seams and increase to 3.5 mm for decorative topstitching.
Constructing the Exterior Pocket
- Prepare the zipper edge: Place the 10-inch (25 cm) pocket zipper face up. Lay the exterior front pocket piece right side down along the top edge of the zipper tape, aligning raw edges. Layer the pocket lining right side up against the back of the zipper tape. Pin or clip through all three layers.
- Stitch the zipper: Install your zipper foot. Stitch along the zipper tape using a 1/4 inch (6 mm) seam allowance. Flip both fabric pieces away from the zipper teeth, press flat with your iron, and topstitch 1/8 inch (3 mm) along the fold to keep the lining out of the zipper teeth.
- Hem and attach the pocket: Fold under the raw bottom and side edges of the pocket by 1/2 inch (1.3 cm) toward the lining side and press. Center the pocket on the right side of one main body exterior panel, 2.5 inches (6.3 cm) up from the bottom raw edge. Pin securely and topstitch down both sides and along the bottom edge at 1/8 inch (3 mm), leaving the zippered top accessible.
Pro tip: When sewing close to the zipper slider, lower your needle into the fabric, raise the presser foot, and slide the heart puller behind the foot before continuing to sew. This prevents the needle from wobbling and creating a curved seam.
Preparing Handles and Straps
- Fold the strap strips: Take the two carrying handle strips, the shoulder strap strip, and both D-ring tab squares. Fold each strip lengthwise in half, wrong sides together, and press to establish a center crease.
- Tuck raw edges inward: Open the fold. Fold both long raw edges inward to meet the center crease line and press. Refold along the initial center crease so all raw edges are enclosed inside a 1-inch (2.5 cm) wide four-layer strip.
- Topstitch the straps: Set your stitch length to 3.5 mm. Topstitch along both long folded edges of all strips at 1/8 inch (3 mm). Slide one D-ring onto each 4-inch (10.2 cm) tab, fold the tab in half to encase the straight bar of the ring, and baste the raw bottom ends together using a 1/4 inch (6 mm) seam.
Attaching Handles and D-Ring Tabs
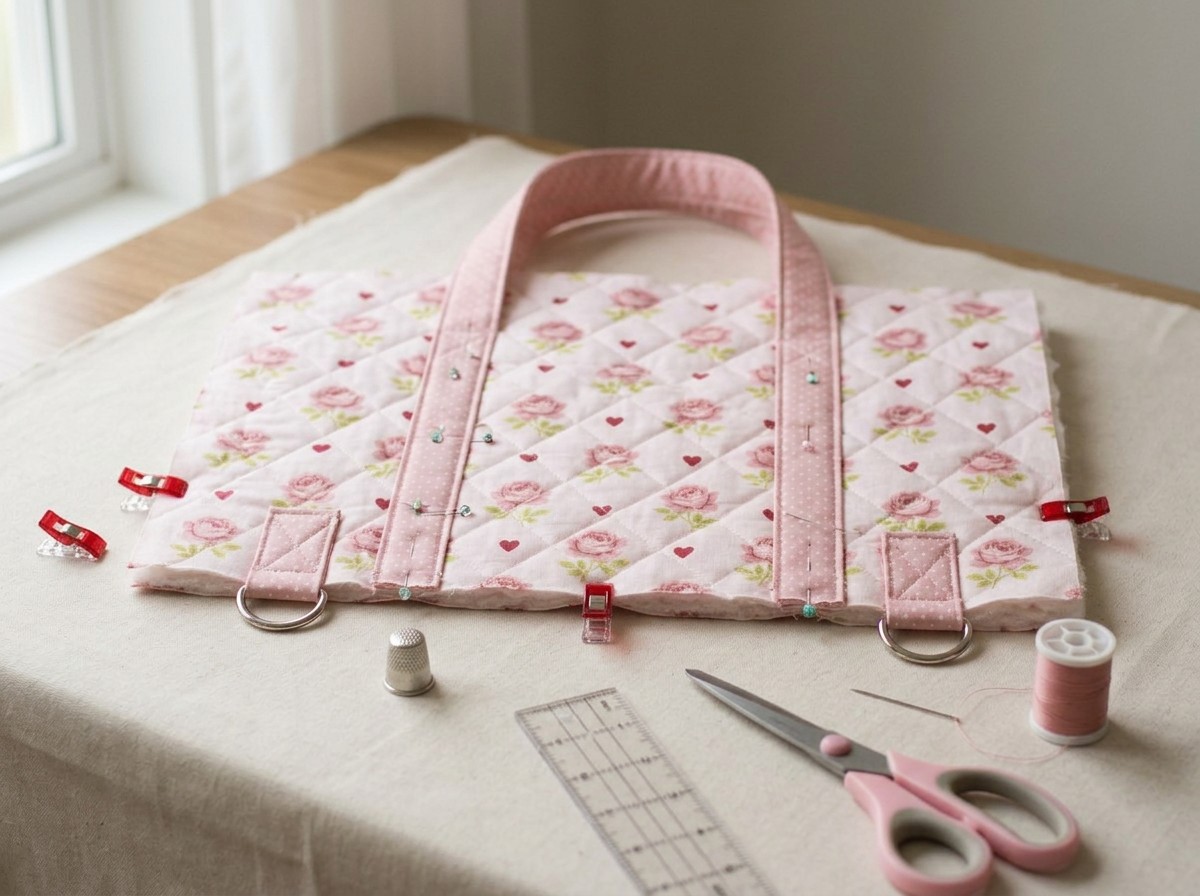
- Mark strap placement: On the front exterior panel (with pocket) and back exterior panel, draw two vertical guidelines 4.5 inches (11.4 cm) inward from each side edge, running from bottom to top.
- Position the carrying handles: Align one handle over the guidelines on each panel, covering the side edges of the front pocket. The handle loops should extend upward past the top edge. Pin the straps flat against the panels, stopping 1.5 inches (3.8 cm) below the top raw edge.
- Stitch the handles in place: Topstitch along the existing handle stitch lines up to the 1.5-inch (3.8 cm) mark. Sew a horizontal line across the strap, pivot, and sew an “X” box for reinforcement before stitching back down the other side.
- Baste D-ring tabs: Center one D-ring tab on each side of the front exterior panel, 3 inches (7.6 cm) below the top edge, raw edges aligned with the side raw edge, pointing inward. Baste in place with a 1/4 inch (6 mm) seam.
Installing the Main Top Zipper
- Assemble zipper plackets: Sandwich the 24-inch (60 cm) zipper between two placket strips (one right side up against the zipper front, one right side down against the zipper back). Stitch using a 1/4 inch (6 mm) seam. Press the strips away from the zipper and topstitch along the seam line. Repeat for the other side of the zipper.
- Attach placket to outer panels: Center the zipper placket right sides together along the top edge of the front exterior panel. Baste with a 3/8 inch (1 cm) seam allowance. Repeat for the back exterior panel.
Pro tip: Switch to a size 90/14 needle before attaching the zipper placket to the main panels. The thicker needle penetrates multiple layers of quilted cotton and zipper tape without deflecting or skipping stitches.
Assembling the Bag Body and Boxing Corners
- Join main exterior seams: Unzip the main zipper halfway. Place the front and back exterior panels right sides together, matching side and bottom raw edges. Pin thoroughly. Stitch down both side seams and across the entire bottom seam using a 1/2 inch (1.3 cm) seam allowance. Press seams open.
- Mark corner cutouts: On the bottom corners of the bag, measure and draw a 4 x 4 inch (10.2 x 10.2 cm) square from the stitched seam lines (or 4.5 x 4.5 inches from raw edges). Cut out the fabric squares with sharp shears.
- Box the corners: Pull the front and back fabric apart at the corner cutout. Flatten the bottom seam directly against the side seam, matching seam lines. Pin the resulting straight edge flat and sew across with a 1/2 inch (1.3 cm) seam. Backstitch securely at both ends. Repeat on the remaining corner.
Assembling and Attaching the Lining
- Sew the lining body: Place the two main body lining panels right sides together. Sew the side seams using a 1/2 inch (1.3 cm) seam allowance. Sew the bottom seam, leaving a 7-inch (17.8 cm) open gap in the center for turning the bag later. Cut and box the 4 x 4 inch (10.2 x 10.2 cm) bottom corners exactly as done on the exterior.
- Join lining to exterior: Keep the exterior bag right side out. Turn the lining bag wrong side out. Slip the exterior bag inside the lining bag so right sides are touching and the top zipper placket is sandwiched between them. Match side seams and raw top edges. Pin or clip all the way around the top perimeter.
- Stitch the top perimeter: Sew around the entire upper opening using a 1/2 inch (1.3 cm) seam allowance. Ensure the carrying handles are tucked safely inside the layers to avoid catching them in the seam.
Finishing and Pressing
Carefully pull the exterior bag out through the 7-inch (17.8 cm) opening in the lining bottom. Push out the boxed corners firmly from the inside using your fingers or a wooden point turner, avoiding sharp objects that could pierce the quilted fabric. Fold the raw edges of the lining opening 1/2 inch (1.3 cm) inside, press the fold, and sew the gap closed using a machine edge stitch or a hand-sewn slipstitch for an invisible finish.
Push the lining down into the exterior bag. Press the upper perimeter seam carefully with steam, rolling the seam slightly toward the lining side so the lining fabric does not show from the outside. Topstitch 1/4 inch (6 mm) around the top opening to secure the lining and give the upper edge a crisp silhouette. Thread the 54-inch (137.2 cm) polka dot strap through the metal slider, loop it through one D-ring, and stitch the folded end securely to complete the adjustable shoulder strap.
Variations and Customizing
- Contrasting bottom band: Cut the bottom 4 inches (10.2 cm) of the exterior panels from the polka dot accent fabric to create a color-blocked base.
- Custom quilting lines: If quilting your own base fabric, mark 1.5-inch (3.8 cm) diamond grids or vertical channel lines using a removable fabric marker before fusing fleece.
- Fixed shoulder strap: Omit the metal slider hardware and stitch both ends of a 40-inch (101.6 cm) polka dot strap directly into the side seams before boxing corners.
- Double zipper pulls: Use a two-way head-to-head zipper on the main opening for easier access from either end of the duffle.
Troubleshooting Common Duffle Bag Sewing Issues
| Problem | Likely Cause | Solution |
|---|---|---|
| Wavy or puckered zipper seam | Stretching the fabric or zipper tape while stitching | Use sewing clips instead of pins to hold zipper taut without stretching fabric; lower presser foot pressure slightly. |
| Skipped stitches on strap corners | Needle is too fine or dull for multiple folded layers | Switch to a fresh universal size 90/14 needle and hand-crank the machine wheel over dense intersections. |
| Boxed corners are misaligned | Side seam and bottom seam not aligned at corner fold | Nest seam allowances in opposite directions and pin directly through the seam intersection before stitching. |
| Bulky seams bunching under foot | Excess batting in seam allowance intersections | Trim away fusible fleece/batting from seam allowances (grade seams) before stitching final joins. |
Care and Washing Instructions
Keep your quilted duffle looking pristine by spot cleaning surface stains with a damp cloth and mild liquid detergent. For a complete wash, close all zippers to protect the teeth, detach or tuck the shoulder strap inside, and gently hand wash the bag in cold water. Reshape the bag while damp and allow it to air dry flat on a clean towel away from direct sunlight. Do not machine dry, as the heat can shrink the outer cotton or warp the internal fusible fleece.
Frequently Asked Questions
Can I use pre-quilted fabric for this travel duffle bag sewing pattern?
Yes, pre-quilted cotton fabric works well and eliminates the step of quilting your own layers. Simply cut your main body pieces directly from the pre-quilted yardage and proceed to pocket and strap assembly.
How do I sew through thick layers when attaching the handles?
Install a size 90/14 needle and increase your stitch length to 3.5 mm. When sewing over the thickest points where straps cross the pocket edges, turn the machine handwheel toward you manually to maintain control and prevent needle breakage.
What size sewing machine needle should I use for quilted cotton?
Use a universal size 80/12 needle when preparing thin strap strips and constructing the lining. Switch to a universal size 90/14 needle once you begin attaching handles, sewing zippers, and closing the boxed corners through batting layers.
Can I add a longer adjustable strap to this duffle bag?
Yes, you can easily customize the strap length by cutting the polka dot strip to 60 inches (152.4 cm) instead of 54 inches (137.2 cm). This provides extra slack for taller travelers or comfortable crossbody carrying over heavy winter coats.
Ready for Your Next Getaway
By completing this travel duffle bag sewing pattern, you have constructed a functional 18 x 12 x 8 inch (46 x 30 x 20 cm) quilted weekender complete with an exterior zip pocket and reinforced handles. The combination of structured batting and thoughtful hardware placement ensures your bag withstands frequent use while remaining lightweight. Before your first journey, apply a light fabric protector spray to the cotton exterior to help repel dust and minor water splashes on the road.