In this post
If you want to sew a compact bag with crisp corners and clean lines, this mini duffle sewing tutorial gives you the exact blueprint. A structured barrel or boxy tote can look intimidating, but breaking the construction down into flat panels makes the entire process approachable. Designed specifically for a confident beginner, this pattern teaches you how to handle sturdy materials, insert a clean zipper opening, and assemble three-dimensional side panels without specialized equipment. In about 2 to 3 hours, you will turn flat canvas and cotton into a fully lined, durable bag measuring approximately 10 in x 5 in x 5 in (25 cm x 13 cm x 13 cm).
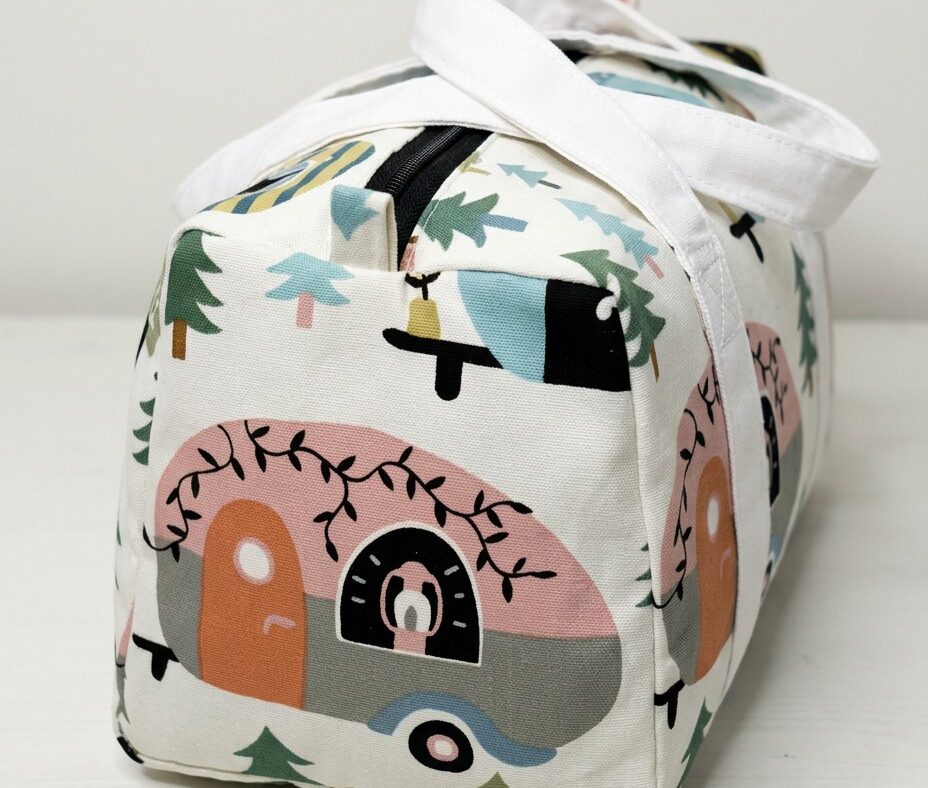
The finished project features a rectangular, boxy shape supported by structured side panels, topstitching, fabric grab handles, and side tabs that assist with opening and closing the zipper. Whether you need a neat travel pouch, a toiletry kit, or a small everyday carryall, this project will help you master bag-making basics step by step.
At a Glance: Mini Duffle Sewing Tutorial Overview
Before cutting into your fabric, take a moment to understand the scope and specifications of the build.
| Specification | Details |
|---|---|
| Skill Level | Confident beginner |
| Time Required | 2-3 hours |
| Finished Dimensions | Approx. 10 in x 5 in x 5 in (25 cm x 13 cm x 13 cm) |
| Seam Allowance | 3/8 inch (1 cm) throughout |
| Exterior Fabric | Medium to heavy weight cotton canvas |
| Lining Fabric | Cotton quilting fabric |
| Stabilizer | Fusible fleece or interfacing |
| Key Techniques | Zipper installation, strap construction, fusing interfacing, topstitching |
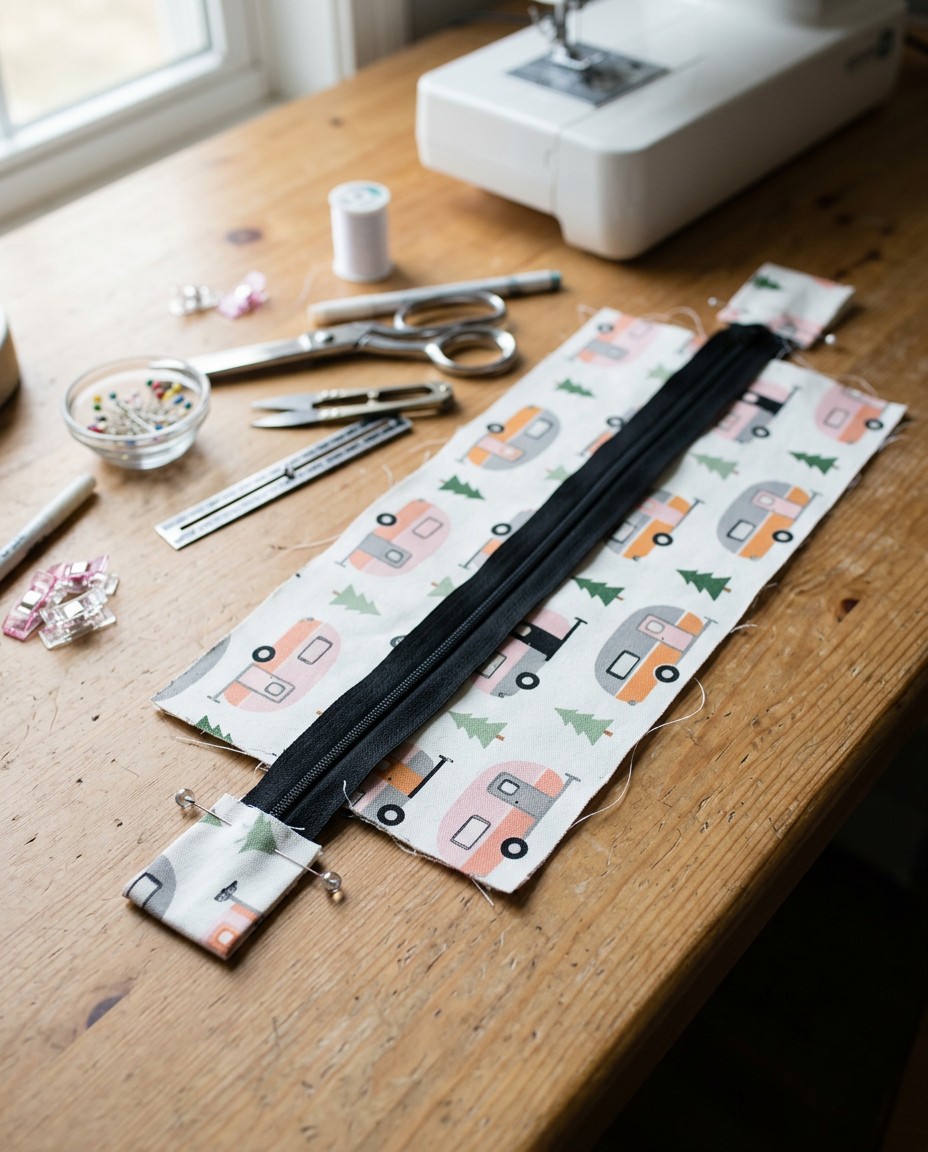
Gaining confidence in bag making starts with projects that teach foundational mechanics without frustrating curves or fussy hardware. A mini duffle provides a practical balance of simple geometry and rewarding construction techniques. Because all pieces are cut as simple rectangles and squares, you can focus on mastering seam accuracy rather than wrestling with complex paper pattern templates.
You will learn how to sandwich a zipper cleanly between an exterior fabric and a lining fabric, eliminating exposed raw zipper tape on the inside. You will also practice stitching through stabilized layers, which prepares your machine handling for larger bag projects. By using a consistent 3/8 inch (1 cm) seam allowance, the pieces align naturally without complex easing. The finished duffle gives you a functional, polished bag that holds its shape independently.
Materials and Tools Needed
Gathering your supplies beforehand ensures a smooth, uninterrupted sewing session.
- Exterior fabric: 1/2 yard (0.5 m) medium to heavy weight cotton canvas (such as a printed camper van motif or solid canvas).
- Lining fabric: 1/2 yard (0.5 m) 100% cotton quilting fabric.
- Stabilizer: 1/2 yard (0.5 m) fusible fleece or firm fusible interfacing.
- Zipper: One 12-inch (30 cm) nylon coil zipper (a contrasting color like black adds crisp visual definition).
- Thread: Matching all-purpose polyester sewing thread.
- Needle: Universal sewing machine needle size 90/14 (essential for penetrating multiple canvas and fleece layers).
- Cutting tools: Fabric shears or a rotary cutter, acrylic ruler, and self-healing cutting mat.
- Marking and holding tools: Fabric marking pen or tailor’s chalk, sewing pins or wonder clips.
- Pressing tools: Steam iron and ironing board or pressing mat.
The crisp, boxy silhouette of this bag relies entirely on pairing the right exterior textile with adequate internal support. Medium to heavy weight cotton canvas provides durability, resistance to abrasion, and an attractive weave texture. Lightweight cottons, stretchy knits, or thin synthetic fabrics should be avoided for the exterior; they lack the body needed to support a boxy duffle and will cause the bag to collapse or pucker along the seams.
Fusible fleece acts as the structural foundation of the duffle. When fused to the wrong side of your canvas exterior pieces, it adds a soft, padded density that keeps the top, base, and side panels upright. If you substitute standard lightweight garment interfacing, the bag will feel floppy and lose its distinct 10 in x 5 in x 5 in (25 cm x 13 cm x 13 cm) profile. A smooth quilting cotton lining keeps the interior neat, lightweight, and easy to clean.
Cutting Chart and Preparation
Accurate cutting produces square panels that match evenly during assembly. Use an acrylic ruler and a rotary cutter on a cutting mat to ensure all corners are true 90-degree angles.
| Piece Name | Material | Dimensions (Width x Height) | Quantity |
|---|---|---|---|
| Main Body Panel | Exterior Canvas | 11 in x 16 in (28 cm x 40.5 cm) | 1 |
| Main Body Panel | Lining Fabric | 11 in x 16 in (28 cm x 40.5 cm) | 1 |
| Main Body Panel | Fusible Fleece | 10 1/4 in x 15 1/4 in (26 cm x 38.5 cm) | 1 |
| Side Panels | Exterior Canvas | 5 3/4 in x 5 3/4 in (14.5 cm x 14.5 cm) | 2 |
| Side Panels | Lining Fabric | 5 3/4 in x 5 3/4 in (14.5 cm x 14.5 cm) | 2 |
| Side Panels | Fusible Fleece | 5 in x 5 in (12.7 cm x 12.7 cm) | 2 |
| Carry Straps | Exterior Canvas | 3 in x 14 in (7.5 cm x 35.5 cm) | 2 |
| Side Tabs | Exterior Canvas | 3 in x 3 in (7.5 cm x 7.5 cm) | 2 |
Pro tip: Cutting the fusible fleece pieces 3/8 inch (1 cm) smaller on all sides than the exterior canvas panels keeps the fleece out of your seam allowances. This reduces bulk in the corners and allows your sewing machine to glide over intersecting seams easily.
Place the fusible fleece with the adhesive (textured) side down against the wrong side of the exterior canvas pieces, centering the fleece so a 3/8 inch (1 cm) border of bare canvas remains around the edges. Set your iron to medium heat with light steam. Press down firmly for 10 to 15 seconds per section without sliding the iron across the fabric. Allow all fused pieces to cool completely flat before handling them.
Preparing Straps and Side Tabs
Once your fabric pieces are fused and stabilized, construct the straps and zipper pull tabs that attach to the exterior shell.
- Fold the carry straps: Take one carry strap strip (3 in x 14 in / 7.5 cm x 35.5 cm) and fold it in half lengthwise with the wrong sides together. Press along the center to create a sharp crease. Unfold the strip.
- Fold the outer edges: Fold both long outer raw edges inward until they meet precisely at the center crease line. Press firmly. Fold the strip in half again along the original center crease, enclosing all raw edges inside a 3/4 inch (1.9 cm) wide strip. Press the strap flat.
- Topstitch the straps: Fit your sewing machine with a Universal needle size 90/14 and set your stitch length to 3.0 mm for clean topstitching. Stitch down both long edges of the strap, 1/8 inch (3 mm) from each folded edge. Repeat this entire folding and topstitching sequence for the second carry strap.
- Construct the side tabs: Take one side tab square (3 in x 3 in / 7.5 cm x 7.5 cm). Fold it in half lengthwise with wrong sides together, press, open, fold the raw edges inward to the center crease, and fold in half again, creating a 3/4 inch wide by 3 inch long strip. Topstitch 1/8 inch (3 mm) along both long folded edges. Repeat for the second tab. Fold each finished tab in half end-to-end to form a loop, and baste the raw ends together 1/4 inch (6 mm) from the edge.
Installing the Zipper and Side Tabs
With your straps and side tabs completed, attach the 12-inch (30 cm) zipper along the top opening edges of the main body panel.
- Position the carry straps: Lay your exterior main body panel right side up on your work surface. Measure in 2.5 inches (6.3 cm) from each long 16-inch side and mark placement lines. Align the raw ends of each carry strap with the top and bottom 11-inch (28 cm) edges of the exterior panel, matching raw edges and ensuring the straps are not twisted. Pin or clip in place, then baste across the ends using a 1/4 inch (6 mm) seam allowance.
- Layer the first zipper side: Place the exterior main body panel right side up. Position your 12-inch (30 cm) zipper face down along one of the 11-inch (28 cm) short edges, centering the zipper tape so equal excess tape extends at both sides. Place the lining main body panel right side down on top, sandwiching the zipper between the exterior and lining layers. Align all top raw edges and pin or clip securely.
- Stitch the first zipper edge: Attach a zipper foot to your sewing machine. Stitch through all three layers along the 11-inch top edge using a 3/8 inch (1 cm) seam allowance. Move the zipper slider past the needle halfway through the seam if needed to keep your stitch line straight.
- Press and topstitch the first side: Flip both the exterior and lining panels away from the zipper teeth with wrong sides facing each other. Press the fabric flat along the zipper edge. Topstitch 1/8 inch (3 mm) away from the folded fabric edge along the zipper teeth using a 3.0 mm stitch length.
- Attach the second zipper edge: Bring the opposite 11-inch (28 cm) raw edge of the exterior main panel up to meet the remaining unsewn edge of the zipper tape, right sides together. Bring the opposite 11-inch raw edge of the lining up to meet the underside of the zipper tape, right sides together with the other lining end. Pin or clip across the edge and stitch with a 3/8 inch (1 cm) seam allowance. Turn right side out through the open tube, press the fabric away from the zipper, and topstitch 1/8 inch (3 mm) from the edge.
- Secure the side tabs: Open the zipper halfway. Center one folded side tab loop over the exterior side of each zipper end, with the raw edges of the tab aligned with the raw edge of the main body and the looped fold pointing inward toward the center of the bag. Baste in place 1/4 inch (6 mm) from the edge across the zipper tape.
Pro tip: Always open your zipper at least halfway before sewing the side panels or closing seams. If the zipper is fully closed when you stitch the outer body and lining, turning the bag right side out later becomes significantly harder.
Assembling the Exterior Body and Lining
With the zipper installed and tabs anchored, the bag transitions from a flat tube into a three-dimensional container.
- Separate exterior and lining layers: Unzip the zipper three-quarters of the way. Pull the exterior main body out to one side and push the lining body out to the opposite side so they form two connected loops separated by the central zipper seam.
- Mark panel center points: Fold the exterior main body opening in half to find the top and bottom center points; mark them with chalk or small clips. Fold the two 5 3/4 in x 5 3/4 in (14.5 cm x 14.5 cm) exterior side panels in half both horizontally and vertically to mark the center of all four edges.
- Pin exterior side panels: Place one exterior side panel right sides together against one open side of the exterior main body tube. Match the side panel center marks with the bag’s bottom center mark and the zipper center. Pin or clip all four sides securely, easing the flat main panel around the corners of the square side panel.
- Stitch the exterior side panels: Using a standard presser foot and a 2.5 mm stitch length, stitch around the perimeter of the side panel with a 3/8 inch (1 cm) seam allowance. When you reach each corner, stop with your needle down precisely 3/8 inch from the edge, lift the presser foot, pivot the fabric 90 degrees, lower the foot, and continue. Repeat this entire process for the second exterior side panel.
- Attach the lining side panels: Repeat the pinning and stitching process for the two lining side panels attached to the lining tube. On one of the lining side panel bottom edges, leave a 4-inch (10 cm) opening unstitched in the center of the seam. Backstitch securely at both ends of this turning gap.
Bag Assembly and Turning
Bringing the exterior structure and interior lining together requires careful manipulation through the designated opening.
- Trim and grade corners: Carefully clip the corners of the exterior and lining side panel seam allowances at a 45-degree angle. Take care not to cut through your machine stitching. This removes unnecessary bulk so the duffle corners push out squarely.
- Turn the bag right side out: Reach through the 4-inch (10 cm) unstitched turning gap in the lining, reach through the partially open zipper, and grasp the farthest exterior corner. Gently draw the entire exterior bag through the opening until the right side of the bag is fully exposed.
- Shape the corners: Use a blunt point turner, wooden chopstick, or your finger to gently push out all four corners of the exterior side panels and zipper ends from the inside. Do not use sharp scissors or pointed tools that could puncture the canvas seams.
- Close the lining turning gap: Pull the lining out from inside the bag. Fold the raw edges of the 4-inch (10 cm) turning gap inward by 3/8 inch (1 cm) so they align smoothly with the stitched portion of the seam. Press the folded edges flat with your fingers or a cool iron. Edge-stitch the opening closed by machine 1/16 inch (1.5 mm) from the fold, or close it with a hand-sewn ladder stitch for an invisible finish.
- Tuck the lining into place: Push the finished lining bag down inside the exterior canvas duffle. Smooth the lining corners into the corresponding canvas corners using your hands.
Finishing, Pressing, and Troubleshooting
A thorough final press creates the crisp, rectangular shape that defines a quality mini duffle bag. Insert a rolled hand towel into the bag to fill the interior space completely. Using medium steam on your iron, press firmly along all square side panel seams and along the top zipper edges. The internal support of the towel lets you press crisp box corners without flattening the opposite side of the bag.
| Issue | Probable Cause | Solution |
|---|---|---|
| Puckering along the zipper tape | Fabric stretched while sewing or wrong presser foot tension | Use sewing clips instead of pins along the zipper to prevent uneven stretching, and reduce machine foot pressure slightly if adjustable. |
| Skipped stitches on corner seams | Needle is too fine or dull for multiple heavy canvas layers | Replace your needle with a fresh Universal size 90/14 or a Denim size 90/14 before stitching side panels. |
| Rounded, collapsed bag corners | Seam allowances not clipped or fleece left in seam allowance | Trim corner seam bulk to 1/8 inch (3 mm) and ensure fusible fleece is cut 3/8 inch (1 cm) smaller than fabric panels during preparation. |
| Zipper catches on lining fabric | Lining was not pressed and topstitched flat away from zipper teeth | Press lining firmly away from the zipper coil and topstitch 1/8 inch (3 mm) along the exterior opening edge. |
Because this bag is constructed with medium-to-heavy cotton canvas and structured with fusible fleece, gentle spot cleaning is the recommended care method. Wipe surface dirt or spills immediately using a clean, damp cloth and mild liquid detergent. Avoid harsh scrubbing, which can abrade the printed canvas surface or weaken topstitching.
If the duffle requires deeper cleaning, hand wash it in cool water with a small amount of gentle laundry soap. Do not wring or twist the bag, as this can dislodge the bonded fusible fleece from the canvas base. Rinse thoroughly, reshape the bag by hand while wet, and allow it to air dry fully on a flat surface away from direct heat. Once dry, restore its crisp rectangular shape with a quick steam press over a rolled towel.
Frequently Asked Questions
Can I use a metal zipper instead of a nylon coil zipper for this mini duffle?
A nylon coil zipper is strongly recommended for this pattern because you must sew across the zipper tape when assembling the side panels. Sewing over metal zipper teeth can break your sewing machine needle or damage the internal timing mechanism. If you choose to use a metal zipper, you must stop your machine and carefully hand-crank the needle between the metal teeth when crossing the tape.
Do I really need fusible fleece, or can I use regular interfacing?
Fusible fleece is necessary to give the mini duffle its distinct, self-supporting boxy shape. Standard lightweight or medium-weight garment interfacing lacks the density needed to keep the canvas walls upright, resulting in a floppy bag. If fusible fleece is unavailable, a firm sew-in foam stabilizer or heavyweight craft interfacing can be substituted.
How do I keep my canvas fabric from fraying while sewing?
Cotton canvas has a loose, coarse weave that can fray rapidly along cut edges during handling. Using sharp rotary cutters rather than dull shears produces cleaner edge fibers. Because all raw edges are completely enclosed between the exterior shell and the cotton lining, you do not need to serge or zig-zag the seam allowances, but handling the cut pieces gently before assembly minimizes fraying.
Can I lengthen the carry straps to make it a shoulder bag?
Yes, you can easily adapt the carry straps to fit your shoulder. Instead of cutting the strap pieces to 14 inches (35.6 cm), cut two strips measuring 3 inches wide by 28 inches long (7.5 cm x 71 cm). Follow the same folding, pressing, and topstitching methods described in the pattern before basting them to the main body panel.
Following this mini duffle sewing tutorial step by step equips you with essential bag-making skills, from interfacing heavy textiles to cleanly installing a recessed top zipper. Your finished 10 in x 5 in x 5 in (25 cm x 13 cm x 13 cm) bag demonstrates how straightforward geometric panels combine into a functional, professional-looking accessory. For the neatest final result, never skip pressing your seams as you sew, and take your time pivoting accurately around the side panel corners. Place your new mini duffle to work holding sewing notions, toiletries, or travel gear.